
If you’re looking to launch your first WordPress website but not 100% sure where to get started, you’ve come to the right place. We have an 8 step guide that will get you off to the right start and help you learn how to launch a WordPress site. We’ll walk through the decisions you need to make (and how to make them) so that you can focus your time on creating content and growing your site.
Decide on Your Hosting
Hosting is where your site is “stored” on the internet. This is where WordPress will be installed and all your content will be saved. Your hosting is really the foundation of your site. It is important to choose a good hosting platform that is:
- Easy for you to manage
- Fast and reliable
While some hosts may have the same technical specifications, they can often have different user interfaces which makes them easier or more difficult to use. If you are not very technical and just getting started, you may want to opt for “managed WordPress hosting”. This is where the hosting provider will make sure that your hosting is setup and optimized for WordPress. This is a great option for most people. The only downside of this is that you often cannot install any other types of sites on this hosting.
If you are planning on having a few different types of sites, you might want to choose a shared hosting plan with a “one click WordPress install”. This will give you more flexibility on what types of sites you can setup but has a nice user interface which makes it easy to install WordPress.
If you’re confident using the command line and Git, this opens up a few other hosting possibilities which have more flexibility but fewer out of the box options.
If you’re not sure where to start, here are a few options:
| Type of Hosting | Hosting Provider | Notes |
|---|---|---|
| Managed WordPress Hosting | NameCheap | Cheap and reliable |
| Managed WordPress Hosting | DreamHost | Great value |
| Managed WordPress Hosting | Kinsta | High performance |
| Shared WordPress Hosting | Linode | Cheap and scaleable |
| Shared WordPress Hosting | SiteGround | Great value |
| Advanced Hosting | Cloudways | Easiest advanced option |
| Advanced Hosting | Amazon AWS | Advanced |
| Advanced Hosting | Google Cloud | Advanced |
Choosing a Domain Name
Once you have your hosting squared away, your next step is to choose (and register) a domain name. A domain name should be memorable and brandable so that your website visitors are able to remember your site and come back if they like your content. A couple reliable domain registrars include:
After registering your domain, you will need to update your “name servers” to point to your hosting. If you use the same hosting service to register your website name, this should either be automatic or very easy. If you register your domain in a different place than your hosting, don’t worry – this is pretty easy as well. You should just lookup “updating named servers” in the help section of your domain name registration – or contact customer support.
Setup HTTPS
The last step before installing WordPress is to buy and install an SSL certificate from your domain registration company. This will make your site secure so that you can safely transfer any information entered by your users. It will also allow your site to show up as https in the browser URL bar. While there are many different SSL providers (and Let’s Encrypt is free) – it is often easiest to buy one through your registrar as they can help you with setup.
Installing WordPress
You’ve got your domain and your hosting, step 4 is to get WordPress installed. If you’re on managed WordPress hosting this should be really simple – it is exactly what your hosting is made for. There should be a button to setup your hosting which will walk you through the steps to install WordPress.
If you are using shared hosting, you should look for a “one click install” or “automatic install” icon in your hosting dashboard – this will typically help you to easily install WordPress and walk you through the configuration. Below are a few screenshots which show how prominent and easy it is to install WordPress.
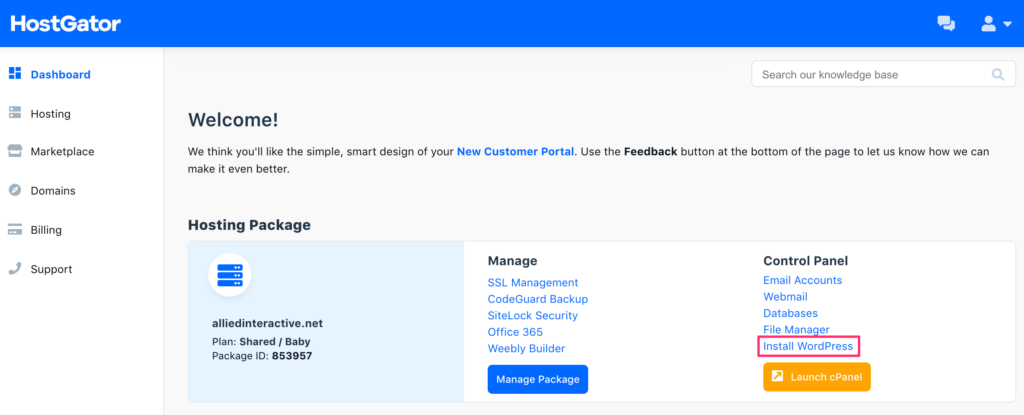
Installing WordPress on HostGator
HostGator has a direct link on their dashboard to install WordPress
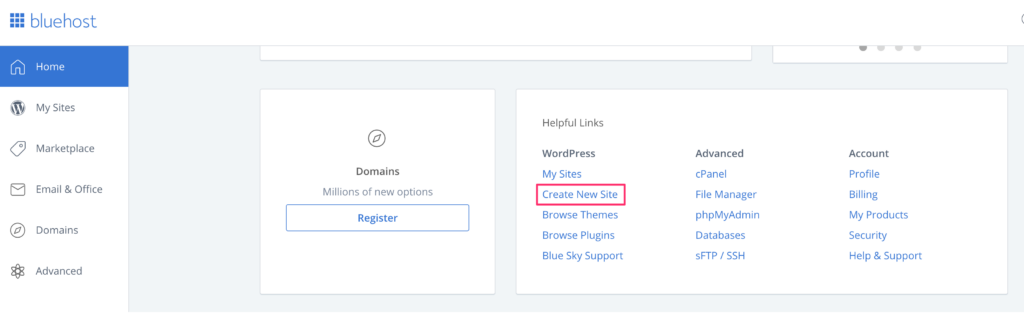
Installing WordPress on Blue Host
Similarly, Blue Host has placed a direct link on their dashboard to install WordPress
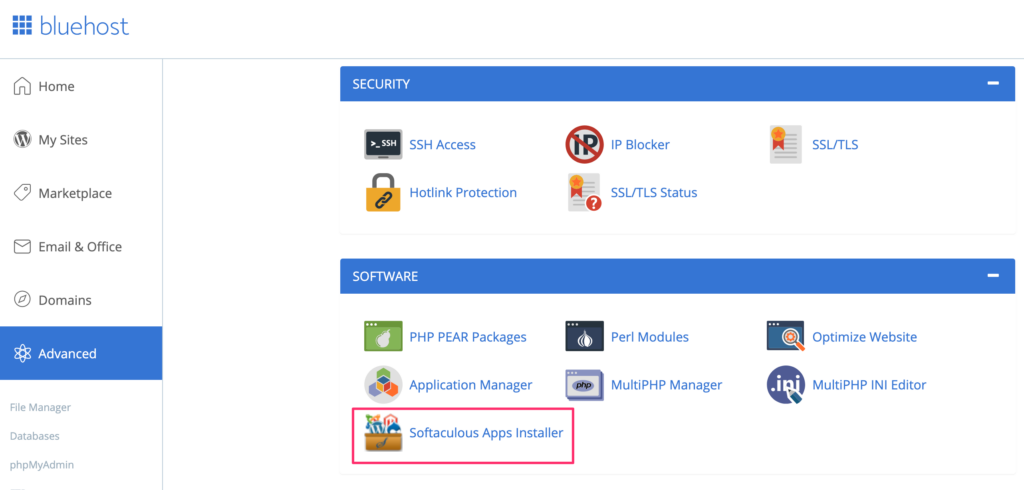
Installing WordPress on CPanel
While many hosting providers have made it very simple and fast to install WordPress, most hosts will have CPanel or a similar solution which has an automatic installer for WordPress – this is how you would start installing WordPress on CPanel:
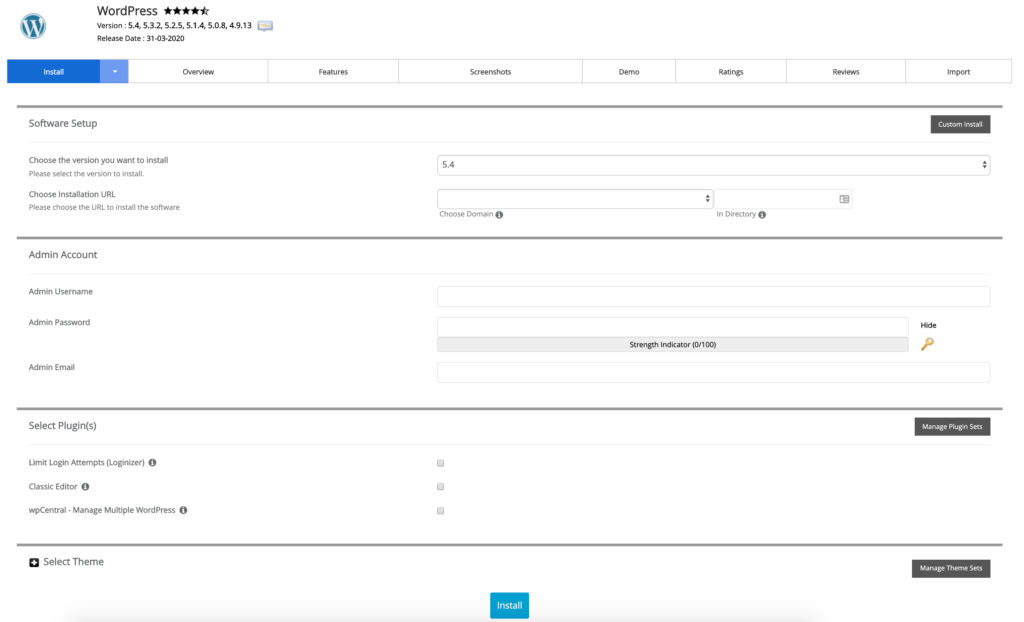
Once you click through, simply choose the prominent WordPress icon, which will bring you to the following screen. Fill out the information on this screen and you’ll have WordPress automatically installed for you.
Choose Your Theme
Choosing your theme when launching a WordPress site can feel overwhelming as there are so many options and considerations. While there is a lot to consider, here are a few tips for choosing your first WordPress theme:
- No theme is permanent – you can change down the road if you are unhappy
- WordPress has many color and design customizations built in
- Most modern themes have many theme layout and design options
- While there are many free themes out there (and many are good!) the paid themes do tend to have more customization options
- Paid themes also tend to have fewer security issues
- If you’re planning to develop multiple sites buying life time access can end up being cheaper in the long run
Recommended Themes
To help you narrow down your options, there are a few great themes to start with:
- Divi – Very user friendly and highly customizable. Comes with 100+ pre-made layouts.
- Astra – Known for being exceptionally fast. Free & premium versions available. Some pre-made layouts included with premium version.
- X – Another popular theme known for being customizable. Comes with many pre-made layouts.
- Neve – Fast and customizable. Comes with many “starter site” layouts.
If the themes above aren’t what you’re looking for to launch your WordPress site, check out Theme Forrest, Theme Grill, and Mojo to see even more themes.
Once you have your theme, just navigate to “Appearance” > “Themes” in the lefthand WordPress navigation and upload your new theme.
Create Your Core Content
With WordPress setup on your domain and your theme installed and customized, the next step is to create and upload your core content. While you’ll probably continually be publishing content to engage your visitors and to keep bringing them back, you should launch your WordPress site with your core content pre-published.
For a blog you should launch with at least 15 posts. For a local business website, you should have a page for all your services and your about / contact page (a couple posts couldn’t hurt as well). While the site doesn’t need to be 100% fleshed out to launch, you should have enough content and structure so that the site doesn’t feel empty.
If you’re having a hard time writing your content (or want an editor to review your content before publishing), your local university may be a good source of qualified writers or Freelancer.com and UpWork have non-local options.
Install Your Plugins
While your theme powers the design of your site, plugins help extend the functionality of your site – the most often use cases for plugins are things like:
- SEO (Rank Math)
- Site builders (Divi, Elementor, Beaver Builder)
- Contact forms (Contract Form 7, Gravity Forms)
- Improving site speed (W3 Total Cache, WP Super Cache, WP Rocket)
- Showing related content (Jetpack, AddThis)
Set Up Analytics
Finally, you’ll want to set up your web analytics. This will tell you how many people are coming to your site, how they are getting there (Google, from other blogs, Facebook, etc), and what pages they are looking at. Google Analytics is the go to for most people – as it is relatively user friendly, has a lot of features, and it’s free.
There are two primary ways to install Google Analytics – pasting the tracking snippet into your source code, or leveraging a tag manager to inject the code into all your pages. Tag managers are often the preferred way to install analytics as they allow for easier advanced implementations (such as event tracking) without any additional development work.
If you want to install the script in your source code, your theme may have an option to do this. Alternatively you can use the Google Analytics for WordPress plugin. If you’d like to use Google Tag Manager, you can use the Google Tag Manager plugin. Alternatively, you can use either of the two following plugins that will allow you to inject any code into your pages (which will support both a regular Google Analytics implementation as well as a Tag Manager implementation:
Once you get through these 8 steps you will be on your way to launching a successful WordPress site. Getting your site live is a huge accomplishment – even if it isn’t 100% as anticipated. The great news is that is easy to continue to update and customize your site as well as continue to publish great content!
How to Launch a WordPress Site
- Decide on your hosting
- Register your domain name
- Setup https
- Install WordPress
- Choose your theme
- Create your core content
- Install plugins
- Setup analytics