If you’re searching for how to leverage browser caching in WordPress, odds are you’re looking to improve your page load time for your users. The good news is that implementing browser caching in WordPress is both easy and can significantly improve your users’ load time on subsequent page loads.
If you’re looking to benchmark your page speed and see how much you are improving, check out the CRUX.run dashboard which leverage’s Google’s user timing data (CRUX report). While the Page Speed Insights tool can provide helpful recommendations, the CRUX report is Google’s new source of truth for page speed.
What is Browser Caching?
Browser caching is when a web browser downloads and stores components of a webpage (images, CSS files, JS files, etc) and then serves the downloaded assets from the computer rather than re-downloading them the next time the asset is referenced. This can significantly speed up the user experience if repeated elements (such as logos, common images, CSS files, and JS files) are served from a computer rather than re-downloading them every time a user loads a new page.
While this can significantly help speed up a user’s experience, there are also drawbacks associated with browser caching – namely what happens if a file is updated? Often, a user can end up seeing the old CSS, logo, etc despite a new version being available. While these can be mitigated with tactics like changing file names and setting shorter browser cache durations, these are less than ideal solutions.
What’s the Difference Between Browser Caching vs Server Caching?
Where browser caching leverages storing elements on a user’s local computer to reduce the amount of resources a user must download from your server, server caching optimizes the work required by the server to deliver a page to the user. WordPress leverages several different files (header, single, footer, sidebar, etc) to generate a page. The server cache effectively creates a fully composed version of a page and saves (caches) it on the server. This prevents the server from having to compile the same page each time a different user wants to access the page.
Does Your Site Use Browser Caching?
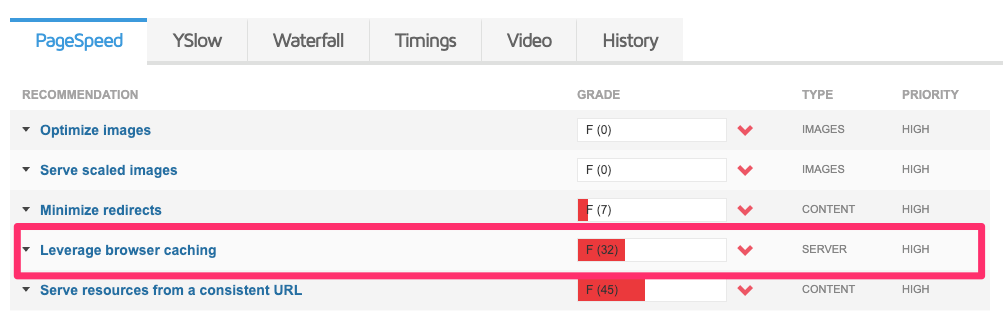
While Google Page Speed Insights used to report whether your site leverages browser caching, the new version no longer displays this information. The good news is that several other tools, such as GTmetrix, do check whether your site leverages browser caching. To get started, pull up GTmetrix, put your WordPress site into the URL bar, and click “Test your site”.

From here you can see whether your WordPress site is leveraging browser caching:
Setting up Browser Caching on WordPress
There are two primary ways for you to setup and leverage browser caching in WordPress: you can use a caching plugin to set this up or you can directly modify your HTTP headers to set up browser caching manually on both Apache and NGINX.
Note: Some WordPress hosting providers have already optimized their servers for optimal performance and have disabled many caching plugins as they conflict with the optimizations made by the host. If you are using a managed WordPress hosting service, check with them about any plugins that may be disabled before installing (or buying) a caching plugin.
WordPress Browser Caching Plugins
There are several popular browser caching plugins for WordPress that you can install to improve your user experience:
W3 Total Cache
W3 Total Cache is one of the most popular caching plugins in the WordPress ecosystem with more than 1 million active installations. It will allow you to optimize your server and browser caching as well as many other site performance related issues such as minifying CSS and JS files and deferring load of less important resources.
The downside of W3 Total Cache is that it is an advanced plugin with many settings which can take a while to work through and optimally configure. Additionally, this plugin is often blocked by hosts offering managed WordPress hosting.
WP Super Cache
WP Super Cache is another extremely popular caching plugin with more than 2 million active installs. It allows you to setup caching and compression to help improve your page load performance. While it has some similar features as W3 Total Cache, it has a simpler interface which will probably be more user friendly for less advanced users. Another distinguishing benefit is that WP Super Cache allows different caching rules by user type (ex: admin vs logged out user) which can help with development and updating content.
Similar to W3 Total Cache, WP Super Cache is often blocked by hosts who are actively working on caching on their servers. Finally, as WP Super Cache is less complex, there is inherently less settings and customizations so advanced users might not find 100% of what they are looking for.
WP Rocket
While both W3 Total Cache and WP Super Cache are free plugins, WP Rocket is a premium theme which allows you to enable caching, lazy loading of images, preloading (building a server cache before a user actually visits the page), compression, database optimization, Google fonts optimization, and minification of CSS – among other features.
In short, WP Rocket is much more than a caching plugin and is worth considering for people who really want to dial in their site speed rather than those who are looking to figure out only how to leverage browser caching in wordpress.
Another bonus of WP Rocket – this plugin is more likely to work with managed WP hosting services (but definitely check before signing up for WP Rocket).
WP Fastest Cache
Setting up Browser Caching Manually
If you’re a plugin minimalist and want to set up your browser caching manually, you can do that too. Note, this is only recommended for advanced users who are comfortable modifying code. Also, make sure you create a backup of your site before modifying any of your server responses as modifying these files can create significant problems if done incorrectly.
While to process different based on whether you are on Apache or NGINX, the concept is the same: You will have to modify your server’s header responses to include instructions to the browser to cache assets for a specified amount of time.
Enabling Browser Caching on Apache Servers
To enable browser caching on an Apache server, you will have to modify your .htaccess file. This can be done via FTP, “file manager” on cPanel, or using a tool like Rank Math to edit the file in WordPress. We will add the “Expires” command which tells a browser how long an asset is valid for as well as the type of file the command is for and how long to cache the asset for.
The caching duration can be specified in:
- years
- months
- weeks
- minutes
- seconds
You’ll want to customize the durations to meet your needs, but below is an example of how you can add browser caching to your .htaccess file. You will also want to customize the file types to your situation as well. Finally, it is helpful to leave comments (#comment which is ignored by the server) in the .htaccess file to help you if you revisit your .htaccess file down the road.
<IfModule mod_expires.c>
#add Expires headers for browser caching
  ExpiresActive On

  # Images
  ExpiresByType image/png "access plus 1 year"
  ExpiresByType image/jpeg "access plus 1 year"
  ExpiresByType image/webp "access plus 1 year"

  # Video
  ExpiresByType video/mpeg "access plus 1 week"

  # CSS, JavaScript
  ExpiresByType text/css "access plus 1 month"
  ExpiresByType text/javascript "access plus 3 days"

  # Other Types
  ExpiresByType application/pdf "access plus 30 minutes"
</IfModule>
Enabling Browser Caching on NGINX Servers
Unlike Apache, there is no .htaccess file. To add the expires header on a NGINX server, you will need to edit the server block directly. Similar to the .htaccess file, you will specify the file type the expires header is to be applied to as well as the duration the assets should be cached.
location ~* \.(webp|svg|png|jpg|jpeg|gif|ico)$ {
   expires 30d;
}

location ~* \.(html|css|js|pdf|swf)$ {
   expires 7d;
}
A Note on Browser Caching and Google Analytics
If you look into GTmetrix, you will be able to see which assets need to leverage browser caching. Frequently you will find Google Analytics in this warning. While Google Analytics does allow their script to be cached, it is only for 2 hours. While the load from downloading Google Analytics is likely significantly smaller, you can cache Google Analytics in the browser by hosting it locally – on your WordPress installation, rather than having Google to host the Google Analytics script. You can do this either with WP Rocket or the Complete Analytics Optimization Suite Plugin (if you go this route, you’ll need to revisit your entire analytics integration and tagging setup).